
How To Build A Low Tunnel Greenhouse at Home
As summer winds down and I look forward to longer nights and cool mornings, I’ve started to think about winter gardening. I’ve been busy this week sourcing supplies to ‘construct’ my own simple ‘low tunnel greenhouse’, basically, a temporary micro-greenhouse – in order to keep growing food and flower crops throughout the winter. This structure will also allow me to start more crops in trays and give me a jump-start on the spring. In this week’s post, I’ll walk you through these easy, no-experience-needed steps to building your own chest-high, 5′ long x 4′ wide low tunnel greenhouse in your yard or local unused green space.
Not being particularly mechanically inclined, I was on the lookout for a simple, sturdy structure that I could build and would meet the following requirements:
- required little or no help from carpenter friends
- wouldn’t need much fussing or fixing
- could be built at a low cost
I first turned toward the guru of season extension in the farming world – Eliot Coleman of Four Season Farm. Eliot farms up in Maine and has led the way in building and growing in structures that withstand all sorts of winter weather. Luckily for me, I then visited Love ‘n Fresh Flowers in Philadelphia as part of a cut flower grower’s conference and watched Jennie Love give a great demo on building a super-sturdy low tunnel for her early spring flower crops. Jennie has an incredibly beautiful blog that details her process and shares tons of insightful tips on flower farming.
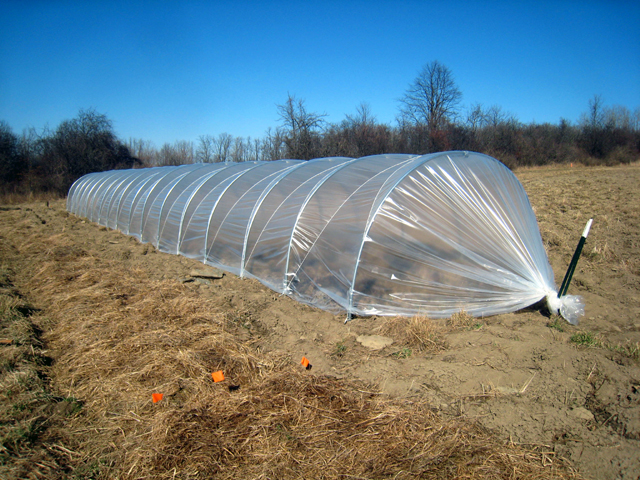
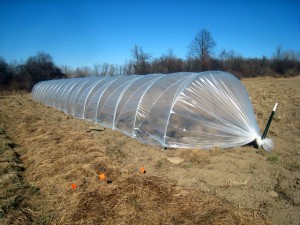
Let’s get to building! While the instructions below are for a 5′ long low tunnel greenhouse, the process is essentially the same for any length. The one that I built this fall is actually 100′ long, see pictures below.
Step 1: Gather your materials
You’ll need:
- 3 x 10′ lengths of either 1/2 inch schedule 40 PVC (for sheltered areas) or 1/2 inch EMT (for windy spots or areas that receive a lot of snow)
- A low-hoop bender if you’re going with EMT
- 8 x 2′ rebar stakes
- A sheet of greenhouse plastic, 10′ long and 10′ wide (check your local garden supply store)
- A big ball o’ twine
- A hammer
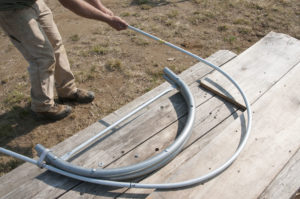
Step 2: Bend Your Hoops
If you’re using PVC you don’t need to do any prep work because they will easily bend by hand as you stick them in the ground. If you’re going with EMT, however, you will need a hoop bender. This is available through Johnny’s Select Seeds. It will run you about $59 and will be your most expensive part. The bender comes with great instructions and it would be hard to go wrong. I had a blast with mine, and made sure to use it out near the road where passersby could see me and assume I was doing something really hard-core and complicated (when in fact it’s super easy!).
Step 3: Outline Your Low Tunnel Greenhouse
Mark 6 small holes in the ground where each end of the three hoops will sit on its own rebar stake. The holes should be 2.5 feet apart on the length of the tunnel, and 4 feet across from one another. For longer tunnels, it’s recommended that you space hoops about 5 – 7 feet apart, but for this small tunnel we’re using just three hoops and spacing them each 2.5 feet apart.
Step 4: Hammer Your Rebar into the Ground
Now that you have your holes outlined, pound your rebar into your outlined holes with your hammer, each about halfway into the ground. You will be using 6 out of 8 of your rebar stakes to hold each end of the 3 the hoops. Remember, your hoops should be 2.5 feet apart from one another, and 4 feet across (the width of a wide garden bed).
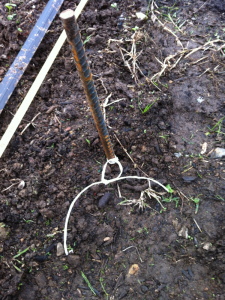
Step 5: Tie an Anchor
Now, take a small piece of twine and tie a small loop around the middle of each rebar stake. You want the loop to be able to rest loosely at ground level. These small loops will serve as anchors when you tie down your plastic in Step 8.
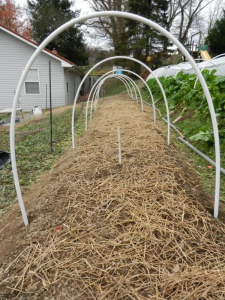
Step 6: Put Your Hoops in Place
Put your 3 hoops in place by sliding them on top of the rebar until they hit the ground. You now have the skeleton of your low tunnel greenhouse.
Step 7: Tie a Ridgeline
Create a ridgeline by tying one long length of twine to the top center of each hoop. Make sure your line is taut. This ridgeline will link the tops of your hoops together and help support your plastic when you drape it over the structure.
Step 8: Time to Place the Plastic
Stretch your plastic over the hoops and twine, making sure it’s even on all sides. On the two long sides of the structure your plastic should just reach the ground, but on the front and back end you will have a few extra feet.
Step 9: Tie Down the Ends
Grab your two remaining rebar stakes. One will be used at the front of the tunnel and one at the back. Stand at the front of the tunnel, facing the first hoop, looking down the length of the tunnel. The extra plastic on this end should be gathered just in front of your feet. Now step back about two feet from the hoop and pound your rebar stake halfway into the ground, centered in the middle of the hoop but a few feet out from it, and angled slightly away from the tunnel. Next, take a length of twine and tightly tie the top center of the hoop (right where your ridgeline ends) to the bottom of your newly placed rebar stake, pulling it tight to hold the end of your tunnel in place . An even sturdier option would be to use a wire and tension bolt kit for this step. You can then gather the extra plastic, twist it a bit, loop it around the rebar (sitting on top of the twine you just tied) and tie it in place with some twine. Repeat this whole process on the back end of the tunnel.
Step 10: Tie Down the Plastic of the Low Tunnel Greenhouse
There are many ways to do this and you should feel free to create your own. This is the method I learned and it works best with a partner. The basic concept is to have you and your partner stand on either side of the hoop and essentially toss the twine back and forth over the top of the tunnel and then pass the twine through those small anchor loops you tied around each rebar stake. Refer to my pictures to get a sense of the pattern I’m describing. For a more in-depth explanation of my method, please see the excerpt at the end of this post.
Voila! You have a simple little low tunnel greenhouse. It will take a little crouching and bending, but this low tunnel greenhouse is small enough that you can easily reach inside and tend to crops in the ground and/or water the crops in trays. Next time I’ll be talking about how to keep growing vegetables during the winter – and this hoop house will come in handy. Stay warm and dry out there, gardeners!
Tying Down the Plastic on Your Low Tunnel Greenhouse (In-Depth Description):
To start the process, cut a long piece of twine – about 100 feet to be safe. Expect for it to get a little tangled in the process. Then, take your friend and stand on either side of the tunnel at the front and back ends. Take your twine and tie off one end to the small loop of twine tied around the rebar in the top corner of the tunnel. Now, pass the twine over the hoop to your friend, where they will feed it through the small loop on the rebar in their corner. Have them pass it back to you over the tunnel, and you can then feed it through the loop on the rebar holding the next (middle) hoop in place. It will look like a big diagonal line over the plastic.
Now pass it back to your friend and have them feed it through the loop at the base of the central hoop on their side, creating a line that holds the plastic in place just inches from the hoop and parallel to it, and then have them pass it to you and you will once again feed it through the same loop again on your side. There should now be a line parallel to the hoop on either side of it.
Now, pass the twine again to your friend and have them shuffle down to the final hoop, pass it through the loop on the final rebar stake, pass it back to you, and you feed it through the loop on the rebar holding the final hoop on your side. You are now standing at the far corner of the tunnel, and just need to tie off the twine. Do so by first pulling the line tight, and then tie it off to the final loop (the one you just passed the twine through), but use a knot that will be sturdy but that will allow you to come back and re-tie it throughout the season if the line becomes slack. Again, there are many ways that you can pattern your twine to tie down your plastic. This method is how I learned, but if you have your own please share in the comment section below.
 Family